I’m going to sculpt more. I’ve done some over the years but never enough to feel like I know what I’m doing. It is difficult and far less relaxing than painting. Typically I make one whole models before giving up and going back to smearing pigment on plastic. This time I’m going to try to build up a head of steam and get a few models done. The plan is to document my progress here stage-by-stage. Questions, words of encouragement, criticism and/or kicks up the arse to keep me motivated are welcome.
I rolled out some ProCreate between to pieces of 2mm plastic card to give a consistent thickness. I used talcum powder to stop the putty sticking to the roller in the same way you use flour when rolling pastry.
After the putty was fully cured it was just a case of cutting out the shapes I wanted with a sharp knife and filing down any angels. In this case the blade of the knife and the stock of the gun. ProCreate is like Green Stuff but can be filed and drilled after it has set. It’s great stuff and I use it filling gaps on models rather than GS.
To make the armature I twisted together two pieces of wire and put on another piece of wire for the head. This piece was superglued in place and bound tighter with some thin wire, again for strength.
Using a Gundam pen (a very thin felt-tipped pen) I marked the shoulders, hips, elbows, knees and feet before bending it into the pose that I wanted. This is, I’ve learned, one of the most critical stages. If you get the proportions of the anatomy wrong here the final model will look wrong. I think that these are right but only time will tell. This armature was then put on a base of baked (hardened) Sculpty.
A thin covering of Green Stuff was added over the wire and when the GS was still soft and sticky FIMO added to cover it.
This is the basis that the rest of the model will be made on. As the GS cures it makes a good solid base that I can work and add FIMO to.
Here I’m beginning to fill out the anatomy and almost have the boots done.
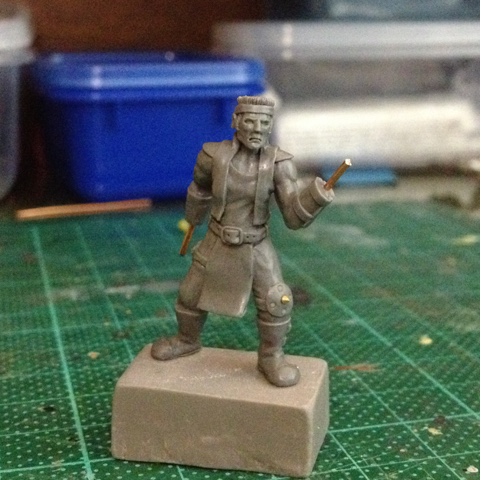
And here is the model a few days later. Progress hasn’t been great this last week: PAXaus was on Saturday and I’ve come down with a cold! The legs and boots are all but done and I’ve began on the torso and shirt. It's very messy at the moment, with lots unfinished. Just needs plenty of more work.
A few notes:
- FIMO is an sculpting clay that hardens when you bake it. I use it because, unlike GS or ProCreate, you can work it for weeks. As I’m still learning it means I can correct my constant mistakes. It is mixed about 50/50 with some FIMO softener to give it a better, less crumbly, more waxy consistency.
- This may not be the very best way to make an armature. Twisting the wire together gives you a very stiff, inflexible “spine” and limits poses to a degree. In the past I’ve soldered three pieces of wire to form the arms, spine and legs but found that this was prone to breaking when posing and re-posing once it had putty on it. I’ve also used A frames of wire with another length of wire for the arms. This too was weak and prone to breaking.
- The plan is to do as much as I can before baking. This increases the chance that I will accidentally put thumb-print by grabbing it wrong or obliterating some detail if i drop it, but it is better to have the option of changing anything at any point. With epoxy putties like GS or ProCreate changing things at a late stage means cutting bits off and starting again. With FIMO I can add and subtract thing as I go.
That's it for now. I've got a busy weekend coming up so expect a post early next week. Any questions just pop them in the comments.
--Richard